memcached + WordPress + DreamHost Shared Hosting

The idea of using memcached on my shared hosting account had been bouncing around my head for a while; especially on my DreamHost shared hosting account. There are periods when the performance would suffer because of other users on the server, and I was also looking for a general increase in performance without having to pay for an expensive dedicated server. I should start off by saying that what I’m about to explain only works if you have a VPS or Dedicated server that you can access already. It may seem redundant for a tutorial or howto guide on how to get memcached working in a shared environment if you already have a VPS available, but the practice and procedures will be useful to allow you to run other customer PHP modules on DreamHost shared hosting. In my case, I already had a VPS server I use for Irssi but was not configured to be a web server. It’s a stripped bare DreamHost VPS with sudo / root access, and a handful of IRC applications running in screen. I had stumbled across this deal, for $5/month (on top of your regular DreamHost bill) when they were beta testing VPS servers and I had volunteered for an account; somehow my account got tagged with the discount, so I decided why not and added one to the account. Not only that, I didn’t want to deal with the migration of switching my accounts over from the shared server to the VPS; the “seamless” transition they have setup is fairly deceiving; I find that it usually borks up the websites in the transfer and requires a fair bit of mucking to get everything working again.

The first obvious problem, even before you go about installing memcached support modules for your web application, is that DreamHost’s default PHP modules for their shared hosting environments do not include memcached. Later I found out that they also don’t have a build of Imagemagick, but the procedures in this guide will apply to also allow you to install Imagemagick on your own.

Before we dive in and get our hands dirty, here’s a little background about memcached and why we want it. Memcached’s website says this about what it is:

memcached is a high-performance, distributed memory object caching system, generic in nature, but originally intended for use in speeding up dynamic web applications by alleviating database load.

The gist of the issue is that PHP is a dynamically interpreted language. Unlike traditional languages like C or Java, you don’t “compile” it, you leave it as source. When someone stumbles on your website, the request for the page pulls the source code into the PHP interpreter, which then compiles it and executes the code before sending the result to your happy web visitor. Because the code is pulled, compiled, and ran each time someone visits your website, there is usually a pretty significant overhead as your PHP slowly stumbles through the compiler. This effect is especially bad for intensive CMS systems like WordPress, which is being used on this very website.

Memcached aims to speed the process up by caching frequently used objects that your PHP code uses – in the case of WordPress, this is achieved through the use of a plugin that queries the memcached server for a cached version of the object before recreating and recompiling the object from scratch. Even with the overhead of checking before creating the object, this results in a significant savings in compilation and execution time. The tradeoff is higher memory usage (space-time tradeoff). The memory usage isn’t really significant for a single user, but can easily balloon if there’s high-traffic website that is hitting the cache often. For this application, I’m just using memcached with the default cache size of 64mb.

Continue Reading

Disabling console blanking in Debian Linux

I find it particularly annoying that the default settings in a stock base Debian install blanks the monitor after about 30 minutes of inactivity. There are a few servers that I have logged in and running htop 24×7 and it’s inconvenient to have to hit the keyboard every time I need to check in on the system.

I did a quick search on Google, but the only results were hack-ish setterm commands crammed into the rc.local or .bashrc files – sure that would work, but instead of setting it at bootup, then setting it again at login, wouldn’t there be a direct way to change the default behavior of the screen blanking? Go dig in /etc and lets see what we find:

pengc99@janus:~$ sudo grep -r setterm /etc/*
grep: /etc/fonts/conf.d/30-defoma.conf: No such file or directory
/etc/init.d/kbd:    setterm_args=””
/etc/init.d/kbd:        setterm_args=”$setterm_args -blank $BLANK_TIME”
/etc/init.d/kbd:        setterm_args=”$setterm_args -powersave $BLANK_DPMS”
/etc/init.d/kbd:        setterm_args=”$setterm_args -powerdown $POWERDOWN_TIME”
/etc/init.d/kbd:    if [ “$setterm_args” ]; then
/etc/init.d/kbd:        setterm $setterm_args
/etc/rcS.d/S16kbd:    setterm_args=””
/etc/rcS.d/S16kbd:        setterm_args=”$setterm_args -blank $BLANK_TIME”
/etc/rcS.d/S16kbd:        setterm_args=”$setterm_args -powersave $BLANK_DPMS”
/etc/rcS.d/S16kbd:        setterm_args=”$setterm_args -powerdown $POWERDOWN_TIME”
/etc/rcS.d/S16kbd:    if [ “$setterm_args” ]; then
/etc/rcS.d/S16kbd:        setterm $setterm_args
pengc99@janus:~$

Hm, /etc/init.d/kbd looks interesting, so lets take a look in there:

# This is the boot script for the `kbd’ package.
# It loads parameters from /etc/kbd/config and maybe loads
# default font and map.
# (c) 1997 Yann Dirson
< 8< ————- snip ————- >8 >
# screensaver stuff
setterm_args=””
if [ “$BLANK_TIME” ]; then
setterm_args=”$setterm_args -blank $BLANK_TIME”
fi
if [ “$BLANK_DPMS” ]; then
setterm_args=”$setterm_args -powersave $BLANK_DPMS”
fi
if [ “$POWERDOWN_TIME” ]; then
setterm_args=”$setterm_args -powerdown $POWERDOWN_TIME”
fi
if [ “$setterm_args” ]; then
setterm $setterm_args
fi

Hm, it looks like it’s looking for the variable BLANK_TIME and POWERDOWN_TIME in the config file /etc/kbd/config – lets take a look in there:

# screen blanking timeout.  monitor remains on, but the screen is cleared to
# range: 0-60 min (0==never)  kernels I’ve looked at default to 10 minutes.
# (see linux/drivers/char/console.c)
BLANK_TIME=15
< 8< ————- snip ————- >8 >
# Powerdown time.  The console will go to DPMS Off mode POWERDOWN_TIME
# minutes _after_ blanking.  (POWERDOWN_TIME + BLANK_TIME after the last input)
POWERDOWN_TIME=30

Perfect! Change these from their respective values to 0 and it will effectively disable the screen blanking:

BLANK_TIME=0
POWERDOWN_TIME=0

Restart kbd and you’re good to go:

pengc99@janus:~$ sudo /etc/init.d/kbd restart
Setting console screen modes.
Skipping font and keymap setup (handled by console-setup).
pengc99@janus:~$

Continue Reading

PowerMac G4 Debian Linux SMP Support

Update 6/9/2011: I have put in a bug report (#629492) with the Debian developers to notify them of this issue.

It looks like there is a bug in the installer for Debian Lenny/PPC that causes the installation to improperly detect SMP configurations. I have a Quicksilver PowerMac G4 dual 800 – after I finished installing Debian I noticed that the server was only seeing one processor:

pengc99@baccus:~$ uname -r
2.6.32-5-powerpc
pengc99@baccus:~$

Not to panic, the solution is actually rather simple. Just install the SMP kernel meta-package:

root@baccus:~# apt-get install linux-image-powerpc-smp
<!– lots of installing stuff here –!>
root@baccus:~#

Reboot the server, and then check the kernel again:

root@baccus:~# uname -r
2.6.32-5-powerpc-smp
root@baccus:~#

Continue Reading

Snow? In my state? (Edit: ice lolololol)

Houston gets an onset of cold weather (mid – high 20’s) and a little bit of freezing rain / sleet while I’m at work. While on break I walk around to check out the condition of roads…while most of the surface streets seem fine, our sidewalk at work is coated in a sheet of slick ice, and our Employee of the Month sign is very frosty looking:

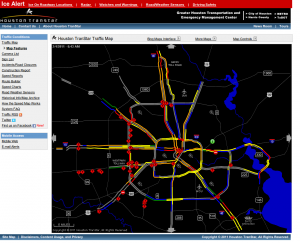
Back in the toasty confines of my swampy gator-cubicle, I check the traffic conditions for Houston and this is what I get:

Awesome, just awesome. Thanks to @Snipa_ABlair for the photo.

Continue Reading

Ugly shell scripting

Recently I developed a strange wear pattern on my car’s front passenger side tire (that’s front rightside tire for those driving on the “wrong” side”) – the outer surface of the tire was warn almost completely bald while the inside treat was fresh and meaty. This was rather odd, as I recently had the car re-aligned with zero toe and max negative camber, which comes out to around -1.6 on both sides. Later I found that as a result of this slight adjustment, I had been pushing the car a lot more aggressively while driving to and from work. The downside of this, as I retraced my steps, is that my drive home from work is almost entirely left turns. When coupled with the fact that I had been recently pushing the car very hard on these left turns, it made sense that I had worn out just the outer edge of the tire.

Since the car is AWD, I didn’t have the option of just replacing that one tire as the difference in tread levels can be harmful to the AWD system. Now here comes the difficult task of finding a single Bridgestone Potenza RE-960/AS Pole Position tire in 225/45/17 so it can be shaved down and mounted.

After some searching I came upon the website BestUsedTires.com – but searching for “Potenza 960” yielded the tire in all sizes but the size I needed. Now, since I’m lazy, how would I automate this search and have my computer notify ME instead of having to manually check every day for the tire I needed?

Continue Reading
1 4 5 6 7 8 16