Flip-keys certainly are fun – a neat little package with the key and the remote control all in one. A compact package when all you need is the remote to unlock the doors, and with the press of a button, the key flips out so you can start the car. My Volvo XC90 utilizes this type of key, as well as many other P2 Volvo models.
However, some models of the Volvo flip-key suffered from poor internal construction. The small plastic and metal parts were fragile, and if the key was dropped the plastic parts would often break. This would cause the key to either get jammed in the closed or open position, or the spring action would fail and the key blade would not stay in any position in particular, flopping around and catching on other things in your pocket.
Luckily, they are relatively easy to repair. You’ll need a few items, all of which can be obtained on eBay or AliExpress. The repair takes about an hour and you’ll be dealing with very small parts. I used Xacto brand razor saws and hobby knives but any brand that makes a thin razor saw and precision hobby knife should work.
Tools you’ll need:
- Replacement Volvo flip-key head
- Precision razor saw
- Precision hobby knife
- Torx T10 driver
- Small flat-blade screwdriver
- Large flat-blade screwdriver
- High-quality two-part epoxy
Step 1: Separate the flip-key head from the body
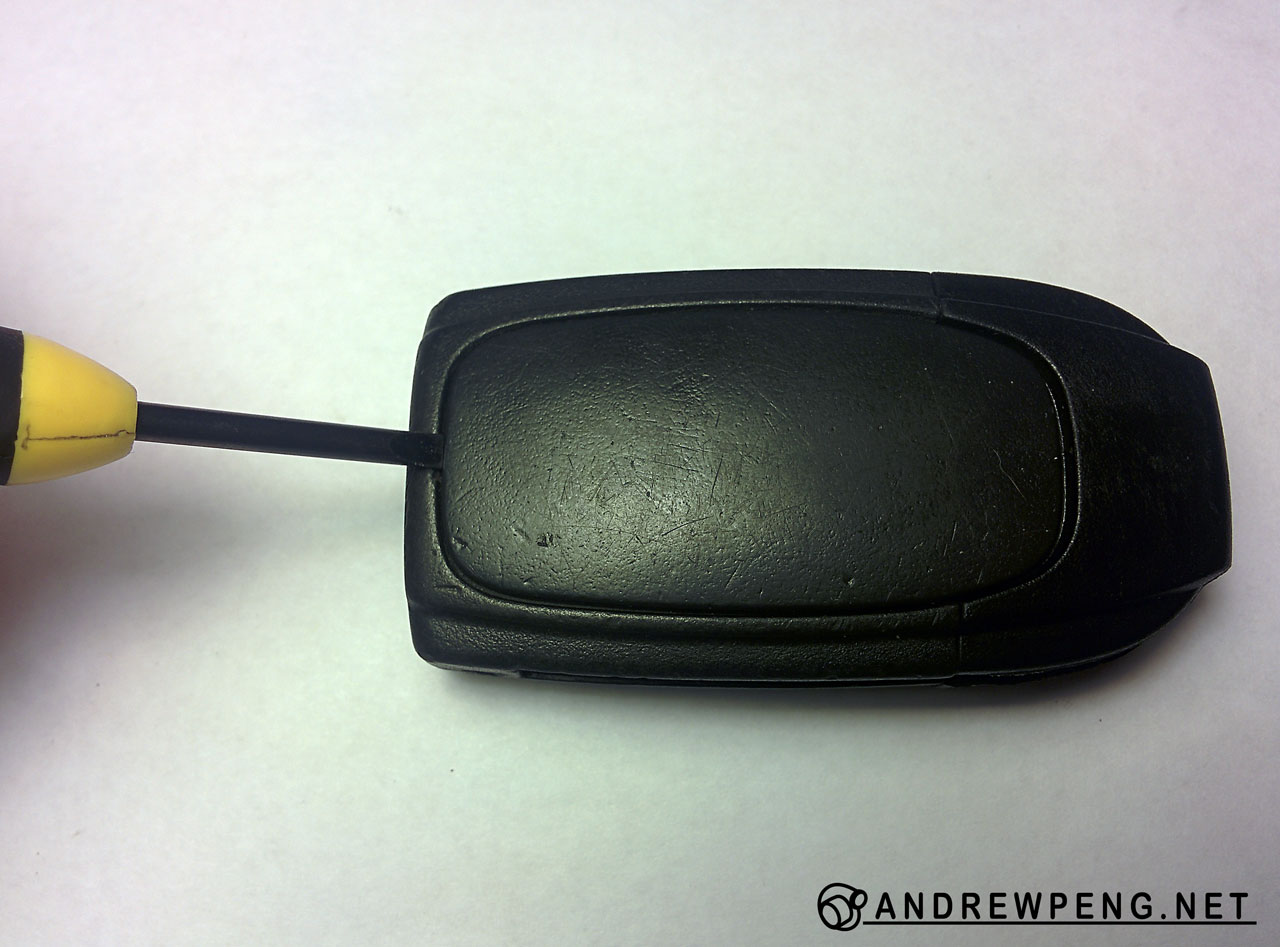
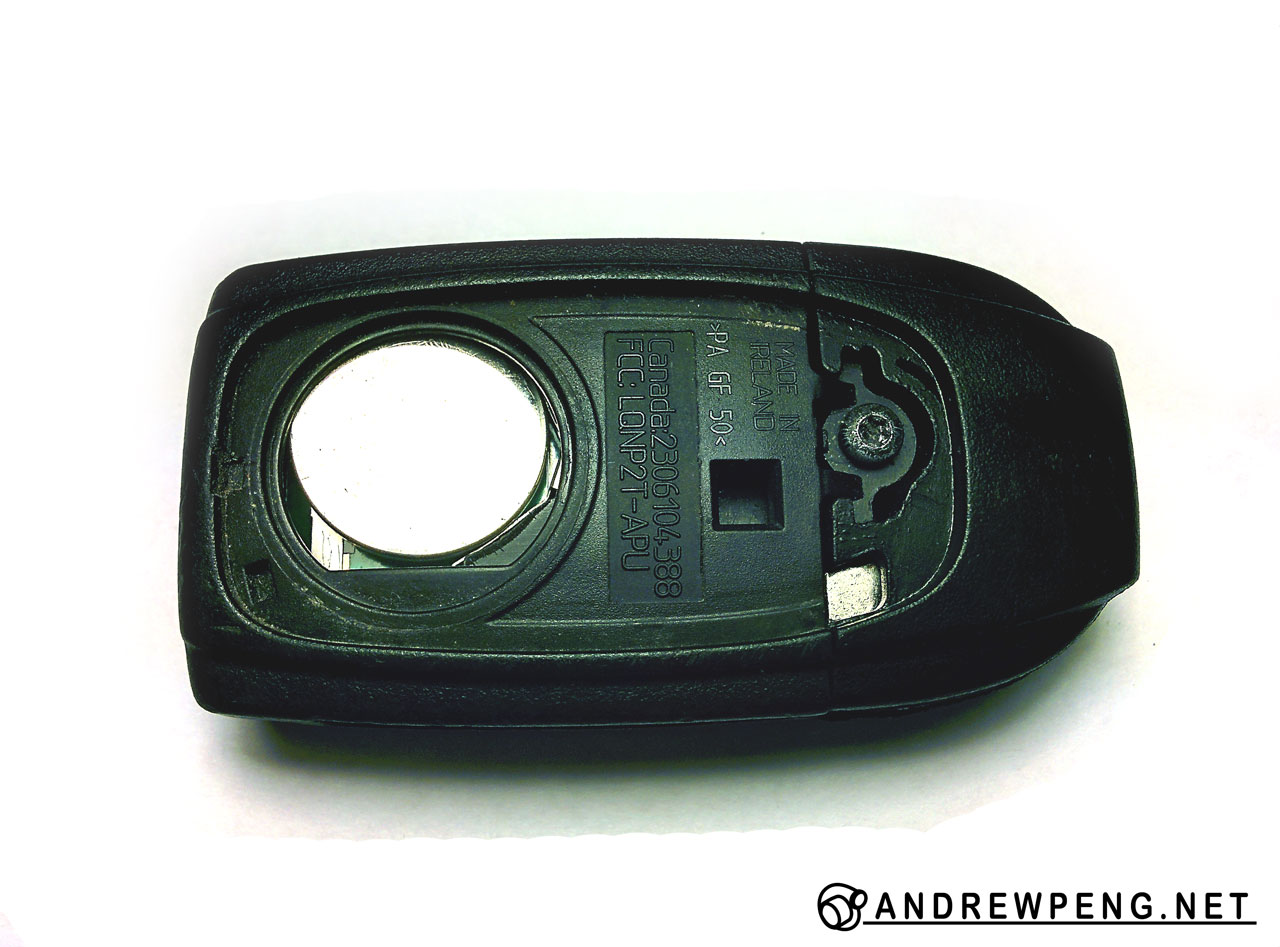

Using the small flat-blade screwdriver, pop off the backing that exposes the battery. Use the Torx T10 driver to remove the screw that attaches the flip-key head to the body. Once the screw is removed, the flip-key head slides off.
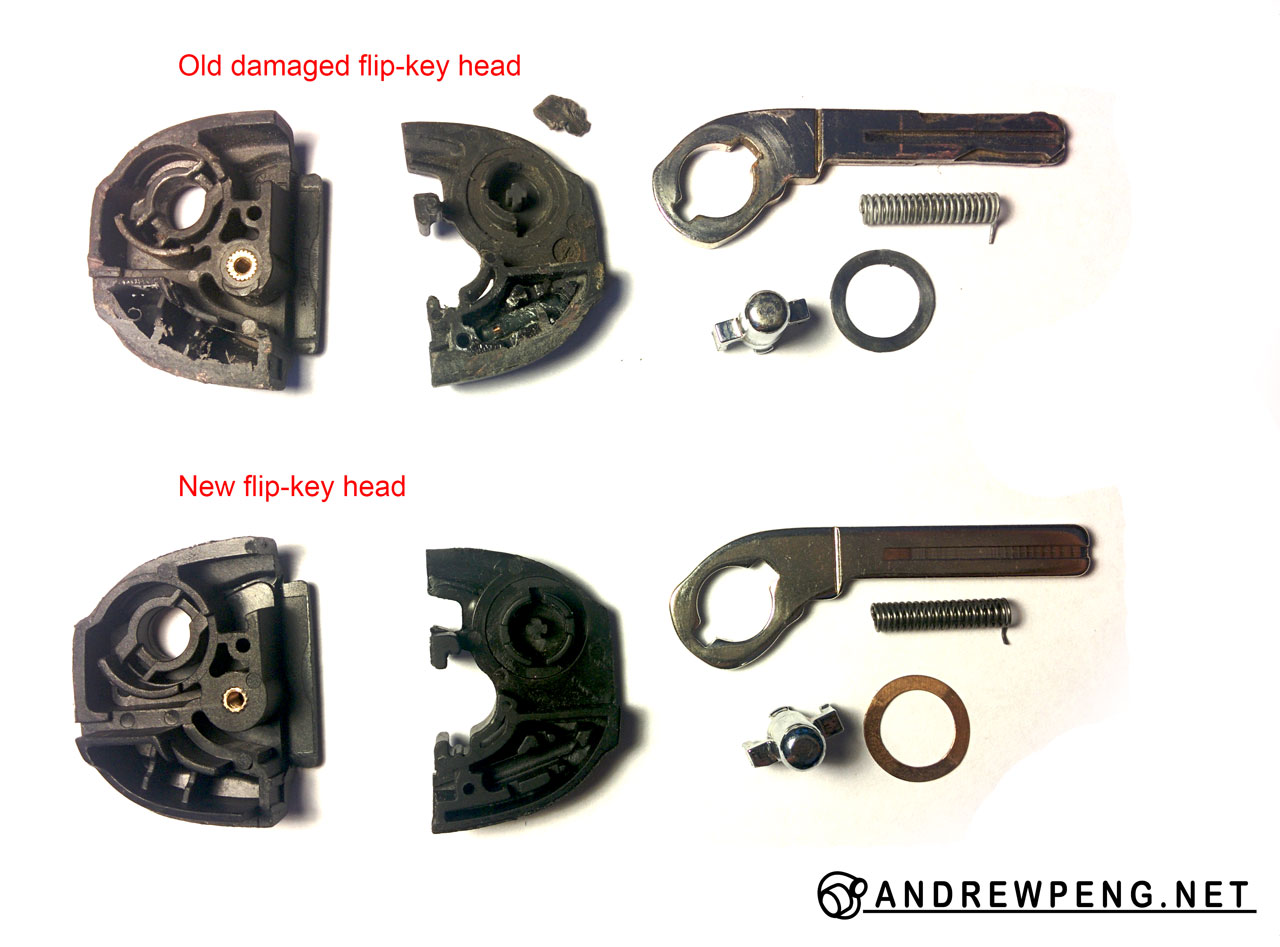
Step 2: Saw through flip-key head to separate into halves

Using the precision razor saw, saw through the side of the flip-key head opposite the key blade. This will take some time to saw cleanly and neatly. The halves are glued together from the factory so it will take some time to work through the plastic pegs and glue. When it has been sawed through enough, use the large flat-blade screwdriver to separate the halves. You may have to saw through more or break off some of the standoffs to separate the halves. When prying, be careful when prying to prevent damage to the transponder chip which is encapsulated in glass.
Step 3: Remove transponder chip and key blade
The transponder chip is encapsulated in glass and glued into a small pocket in the flip key head. Using the precision hobby knife, carefully cut away any plastic that is holding the transponder chip in. Slowly scrape off the glue that holds the transponder in, and carefully cut around the chip to release it. With patience and gentle prying and careful cutting, the chip can be removed without damage. The key blade is easy to remove, just lift it up and take it out.
Step 4: Transfer transponder chip and key blade to replacement flip-key head
All of the parts drop onto the new flip-key head. Use a small dab of glue to secure the transponder chip inside the new flip-key head. Install the washer, spring, button, and key blade.
Step 5: Pre-load the spring and close the flip-key head halves
You need to pre-load the spring by rotating the button counter-clockwise. This is hard to describe but easy to do if you examine how the spring mechanism works. I found it easiest to leave the key blade in the open position, then pre-load the spring by rotating the button, then with one finger on the button, put the other case half on top and squeeze it shut. Test the operation of the flip-key before proceeding to the next step. If it didn’t work, just separate the halves and try again. I also found it nice to bend the washer into a wave-shape to put more pre-load on the key blade to prevent rattles and make it fit better.
Step 6: Re-assemble key
Mix and apply the two-part epoxy to the halves of the flip-key head. Be careful when applying the epoxy to prevent sticking the moving components. Press the halves together firmly to close the gap. Mate the new flip-key head to the existing remote body and use the Torx T10 driver to screw the halves together. Pop the cover back on, wait for the epoxy to cure, and test it out! Pat yourself on the back for saving nearly $1000 by not ordering a new key from the dealer and programming it for your car.
Did you find any of the information useful? Have I helped you save a bit of money / time / frustration? I've spent a lot of time taking pictures and meticulously documenting everything to post it here. I'd really appreciate it if you could send me some money via Paypal! This helps defray the cost of running this website and also provides me with beer to continue writing these articles. Thanks!
22 Comments
Enjoyed your article about fixing a remote key fob.
My 2006 Volvo key is broken. Meaning the key is loose. It an close, but without the spring.
it is loose and can just open up.
Is there no other way to separate the two pieces other than sawing?
I went on line on line to find a new our used case, but found it difficult.
Rich
Hi Rich;
The halves are glued together and cannot be separated unless they are sawed apart. Hope this helps.
Yes but do need to change the ignition?
Good directions here and easy to follow. Instead of moving the transponder to the new head, I just reused the old one. It was only the button that was broken. Also not sure if there is any need for the epoxy as the screw holds everything together.
Hi Andrew, can you send me a link to where to buy the replacement flip key head?
Try Amazon
Andrew,
Do you have any further advice/ideas on releasing the transponder. I’m at that step, and mine is pretty well encased in glue on all sides and seems to be a snug fit into the key as well. In other words, I’m not having any luck picking out out with a small knife. (granted I’m not keen on prying on the transponder either)
I am in the same boat as you are mark. I can’t get the transponder out and I don’t want to be too aggressive and risk breaking the glass capsule. I’m thinking of soaking the part in nail polish remover overnight to maybe soften things up a little bit? Or lacquer thinner even.
I was in the same place as Mark and Bobby. It looked like the transponder was covered it glue and I was skeptical about cutting the glue and and prying on the glass case.
I ended up using a heavy pair of wire cutters and vice grips and I cut the plastic away from the transponder until the side of the transponder was exposed. I’m not talking about the little plastic pieces holding the transponder in place, if you have some heavy duty cutters, you can cut and pry away the whole side of the plastic shell until you can expose the transponder enough to pry it up. My key was from 04. So the glue was dried up. Really easy to pry was I could get to it. Obviously, if you take my route, be VERY careful not to crack the glass. Hope that helps.
Any info on turning my regular type key from a 2002 s80 into the 04+ switchblade key? Already have the key blank and remote.
Can use Super Glue remover for the chip, dribble some into the area and let it sit, then very carefully remove the glue around the chip and work it until it’s loose.
I just finished a repair following these instructions for a Volvo 2006 V70 flipkey. All went well and found 2 shortcuts I’ll share now.
If you can’t find a razor saw, Ace Hardware sells serrated box cutter blades that work fine – and a quick pry with a screwdriver pulled the old Volvo key halves apart.
Thankfully my transponder was just wedged into the key housing – a pick tool pulled it out with gentle pressure. I got my new key housing from China via eBay for less than $3 including shipping.
When reassembling my existing key with the new components, I found an easy way to pre-load the spring by using the new upper key housing as a tool to twist the spring counterclockwise. A single rotation kept the silver button in place and the key blade was left open so the whole assemble presses together like a charm. Hope that helps.
Hi!
Happy New Year!
I have volvo 200, V 50.
I need fix a key.
How long I will wait for fix my key.
I have Volvo 1999.
It do not have a flip key.
Do you be able make?
Sincerely,
Kazimierz Bogusz.
Thank you so much for posting this instructive information. I used a Dremel moto tool with cutting blade to carefully cut open the key case so as to gain access to the chip. I’m amazed that the chip is housed in a small glass tube. Who knew? I ordered a new key fob thru Amazon. I inserted the chip (tube) into the new end piece and put some superglue on top of it to secure it. I used a little bit too much super glue and it followed the channels in the plastic key fob. The next day when I worked on it I realized the super glue had followed the interior channels and melted the plastic. I was unable to place the other half on it due to disfigured plastic. I had to order another key fob from Amazon and repeat the removal with the Dremel. With the new key fob, I inserted the chip in the slot and it was secure enough not to require glue. As for the spring, It took me many attempts to wind the spring. Success was achieved when I used the top of the key fob to wind the button/spring and then push the housing closed. Half the battle was to know where to first position the top of the key fob to begin the winding. I did this based on the slots in the key fob and key itself. Wrong orientation resulted in a weak key release. Once I obtained the desired spring tension, I pushed the top down and secured it with the T-10 screw. I did not need epoxy to seal it shut. It held shut on it’s own. Earlier in the week I told the Service Manager at Volvo what I was up to and he laughed and said that he would see me next week when I needed to purchase a new key. I can’t wait to see him this week and show him my salvaged key fob. Thanks again.
I made a donation as requested via PayPal. Thanks for your help!
Has a anyone tried using a Dremel drill to separate the two halves? The cut would thinner, cleaner and faster – I would think.
Hi there, I just wanted to drop a note to say THANK YOU for the detailed write up and photos. They were very helpful in locating the transponder chip in my key. My tips for anyone reading are that you can cut open the key using a simple hacksaw, by sliding the key carefully against the stationary blade. Then, set aside 30-60 minutes to very gently and patiently cut away the plastic and glue holding in the chip. Take your time to avoid damaging the glass tube!
I had bought a new fob and had pieces from others as not all fit the hole in key before used super glue but whole thing came apart excellent instructions but do need the epoxy as screw only hold the full head together and twisting of key in ignition puts stress on head so need the epoxy to hold halves together. Realized key in half with chip does not work regularly so had a regular key made with chip in it and had that programmed so would have that around if switchblade came apart.
Hi Andrew,
accidently broke little tabs that hold battery in my 2018 volvo key fob, any suggestions on how to repair or hack a fix to keep battery in place?
Any interest in doing the process you describe for me> Cost?
uopolp
jioqn0